Time grid
The time grid is the grid in which the courses are positioned; it must cover all the slots in which activities can be planned. Every user can then mask the slots that do not interest them.
Administrator configuration
Configure the time grid during the creation of the base
When you create a new base, you are requested to configure the time grid.
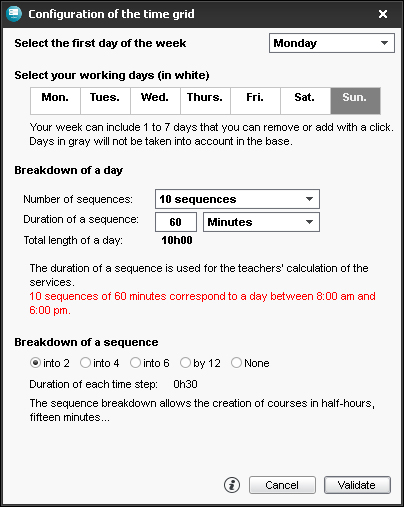
- Indicate the first day of the week (by default, it is Monday).
- By default, the working days will be from Monday to Saturday. If no classes have a course or if no meetings will ever be held on Saturday, un-click Saturday. The days that are shadowed will never appear in EDT; the others can be displayed or masked by every user.
- Indicate the number of sequences per day, without forgetting to include a midday break and think of eventual meetings at the end of the day: for example, if you have 4 hours of course in the morning, 4 hours of course in the afternoon and a 2 hour break, choose 10 sequences. The first and last sequences can be masked by the users that do not need them.
- The duration of a sequence is used for the calculation of the services: if your course lasts 55 minutes with 5 minutes between courses, leave the duration of the sequence at 60 minutes.
- Choose the time step, i.e. the smallest duration necessary to specify a course: 30 minutes if your courses last 1 hour, 1 hour 30, 2 hours, etc.; 15 minutes if some courses last 45 minutes, 1 hour 15, etc. Do not choose a time step inferior to your needs; your grids will be more spacious (Time step). New You can now divide the sessions into 3 to create 20 or 40 minute courses.
Note: when you choose your number of sequences, do not take into account the class committees or the parents/teachers meetings that can occur at the end of the day: EDT manages them independently (on the other hand, the concerned day must be a working day).
Customize the grid for one of the institutions (School complex)
- Go to the menu Parameters > institution > Identity.
- Select the tab for the institution whose grid you want to customize.
- Tick the option Use a customized grid for this institution.
- In the popup window, modify the configuration and validate.
- to change these parameters later, use the button
 .
.
Initialize schedule times with the assistant
The time designations are visual hints: they have no effect on the conception of the timetable, but facilitate the readability of the timetable.
Prerequisite You must login as an administrator.
- Go to the menu Parameters > institution > Times.
- Click on the button Initialize the times according to my criteria. You must first have placed the midday break on the grid (Midday) and any recesses (Recesses).
- In the popup window, specify the beginning time, the actual duration of the sequences (in minutes) as well as time for the lunch break and recess. If a recess is missing, go back and enter it in Parameters > institution > Recesses.
- Validate: the times are automatically adjusted. You can always modify them manually:
- Click on the designation to modify it, enter the new time under the format HH:MM (ex. 08:15) and validate using the key [Enter]. By default the modification is employed on the following times (9h15, 10h15, 11h15, etc.); if this is not what you want, un-tick the option Transmit the entry to the following times.
- If the time of the end of a course does not correspond to the beginning of the following course, enter the times for the end of the course. It is displayed on some interfaces and notably in the course form.
- In the tabs Displayed on the screen and Printed in the timetables only leave ticked the times you want to see along side the timetable’s grids
 and schedules
  or
or  on the screen for your printing (these parameters can be modified in the tab Presentation in the printing window).
- If mistakes have been introduced in successive modifications (for example, the time of the ending of a course later to the beginning of the following course), the times are displayed in red. In this case, click the button Correct the inconsistencies for an automatic correction.
Note: you can display the sequence numbers instead of the times. The configuration works on the same principal.
Modify the time grid once the base has been created
Prerequisite You must login as an administrator. For precautionary reasons, we recommend that you make a copy of the base before conducting this manipulation (Copy of the base).
- Go to the menu File > Utilities > Convert the base .
- The conversion of the base will transfer you to Exclusive Usage mode (all the other users will be transferred to Consultation mode). In the popup window, you can modifier the worked days, the number of hours per day as well as the time step.
- Hours can be added or reduced in the beginning or end of the day.
- If courses are placed in the days that you are rendering non-working or a time range that you are deleting, they will not be deleted, they will lose their place: you will find them in failure
 , indicated in red in the list of courses.
 - If you specify a too large time step, the courses using a smaller time step are converted. Take for example, a course of 1 hour and 30 minutes created with a time step of 30 minutes: if you define a new time step of 1 hour, this course of 1 hour 30 minutes automatically becomes a course of 1 hour.
Modify a time directly along side of the grid
Prerequisite You must login as an administrator.
In all the displays Timetable, Multi-resource schedule and Multi-weekly schedule, double-click on the time and enter the time that suits you.
User preferences
Every user can personalize the grid and find their configuration at every connection.
Mask the days/time slots
- Go to the menu My preferences > grids > Presentation of the timetables/schedules or
click on the button
 on he top right of the timetable.
 - In the rubric Structure, select a Customized grid model via the drop-down menu.
- Un-tick the days to hide and select via the drop-down menu the first and last hour of the day to be displayed.
Zoom inside the grid
In all the displays Timetable, ![]() Multi-resource schedule
and Multi-weekly schedule, keep the key [Ctrl] pressed and use the mouse wheel to zoom in and out of the grid.
Multi-resource schedule
and Multi-weekly schedule, keep the key [Ctrl] pressed and use the mouse wheel to zoom in and out of the grid.
Optimize the display with regards to its screen
According to your screen, it may be comfortable to specify a maximum of data to be seen on the screen.
- Go to the menu My preferences > grids > Presentation of the timetables/schedules.
- In the rubric Maximum amount of data on screen, select the maximum number of days to be displayed. To visualize the other days, use the horizontal scroll bar.
- Indicate the maximum number of time sequences to be displayed. Reducing this number notably allows you to easily visualize and manipulate the short courses (10 or 15 minutes). To visualize the other sequences, use the vertical scroll bar.